Monday, June 29, 2015
The CTMH My Crush books are gorgeous inside and out. I love the covers and how they reflect different looks and personalities. But did you know that you could add your own creative touches, to really make it yours?
Here are the covers of a few of my My Crush albums:


Don't be afraid to let your creativity loose! Stamping and diecuts can really make your My Crush album personalized just for you!
Here are the covers of a few of my My Crush albums:


Don't be afraid to let your creativity loose! Stamping and diecuts can really make your My Crush album personalized just for you!
Friday, June 26, 2015
All month, I've been giving you tips on how to be creative and work with My Crush albums for a variety of reasons and types of memory keeping. I've been keeping a My Crush album to document the things that make me happy and hope to continue adding to it all year long.
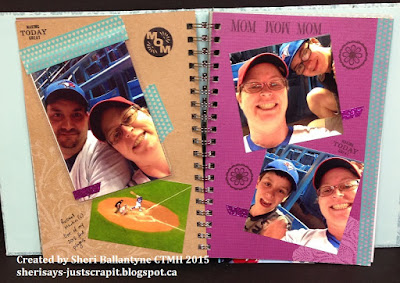
But as I've mentioned before, I've also been working on a My Crush album to complement my traditional scrapbooking for our recent trip to Hawaii. The album was given to me, and already partially embellished by my amazing Secret Sister Denise. And here are some ways that I've filled in the pages ....


Postcards and room cards fit perfectly -- use a Flip Flap as a pocket to keep them safe.


But as I've mentioned before, I've also been working on a My Crush album to complement my traditional scrapbooking for our recent trip to Hawaii. The album was given to me, and already partially embellished by my amazing Secret Sister Denise. And here are some ways that I've filled in the pages ....

I started working on this album during a slow period at a vendor show I was working. My Crush is awesome because you can craft anywhere, even on the go.

Postcards and room cards fit perfectly -- use a Flip Flap as a pocket to keep them safe.

You don't have to only use photos -- keep all kinds of memorabilia together and ready for you to look back on in the future.

Put your heart on the page -- or feel free to leave it blank. I love this spread of my hubby and I -- I got to share the joy I felt when sharing this trip with him. But the second page just said exactly what I wanted, so why clutter it up?
I can't wait to keep working on this book, reliving our trip and capturing the memories that might not fit in my traditional scrapbooking layouts.
Monday, June 22, 2015
Pocket scrapbooking is a hot trend, and I love how the little cards make scrapbooking so easy. I also love how Picture My Life cards can be so versatile and used for so many things.
So if I can use PML cards for making other things, why not add them to my My Crush album?
Here are some spreads, featuring my 10-year-old son Charlie, using PML cards. I love how they turned out.

Here, I used cards to convey various messages, then cut out the star from a third PML card to add as an accent. After all, Charlie is my Superstar!

And here, I use the cards primarily as accents, cutting and punching as needed to add to the page.
So if you're stuck for accent for your My Crush layout, dig out your PML cards and get creative. They're not just for pocket scrapbooking!
Friday, June 19, 2015
I like collecting ticket stubs, receipts, cards and trinkets when we go on vacation. It's an interesting way to add to the story and documenting memories. But sometimes, it's difficult to work them into a traditional scrapbooking layout -- you don't want to cut them to make them fit, but you don't want to leave them out. So what do you do?
You make a pocket! This technique works for both 12x12 layouts as well as My Crush memory keeping.
Here, I'm making a My Crush album with memories from our recent CTMH Incentive Trip to Hawaii. My Secret Sister Denise gave me this album, and I'm using it as a complement to the traditional layouts I'm creating -- it's a great place for all those brochures, tickets and other memorabilia that I collected.

This is one of the opening spreads. At Aulani, they left us a little newsletter each day, with all the happenings around the resort. So I used a paper shopping bag that I got and attached it to the page. I'm going to fold up the "Daily 'Iwa" editions and tuck it in that bag. Then, later on, I can pull them out, read all sides, and remember the good times we had.

A flip flap doesn't have to flip. You can also use flip flaps as pockets! I simply used to washi tape to tack down the bottom of the flip flap, and then slipped in this Aulani brochure that I wanted to keep.

Thursday, June 18, 2015
Your My Crush album is a great place to try out different journaling techniques. Writing or using an existing recipe, like I did in this post earlier this month, is one way to journal. Another way is to get multiple people writing something about the same event or memory.
I created this spread about my son Sam's Sea Cadet Awards Ceremony that was held in May. Sea Cadets is a big part of his life, and he works hard to reach his goals within this group.

So I took the "He Said, She Said" approach to journal about this special night. I wrote about how proud we are of him. And I let him have his say, too. Flip Flaps are great for this type of journaling because you can make the most of your space.

Monday, June 15, 2015
Large, traditional scrapbooks are great, but
sometimes you want something smaller – something themed and something you can
take places and show off! That’s why the
talented ladies on the Cross Canada Blog Hop are featuring Mini Albums this
month! Take a hop through and see the
amazing and mini creations my sister CTMH consultants have put together!
ABOUT THE HOP
·
This is a circular hop so you can start here
and go all the way around.
·
If you want to start the hop in the East and
move cross-country to the West, start with this blog.
HERE'S MY PROJECT: First Birthday Hip Pics
Album
My eldest son Sam turned 1 before I
started scrapbooking, so I had all the pictures from his party in a cheapy 4x6
photo album. Now that he’s 14, it was
about time for me to create a special keepsake for that celebration.

I used the Hip Pics album because it’s
perfect for 4x6 photos, and the pocket pages make it easy to just slip the
photos inside. And the Confetti Wishes paper is great for any birthday!

Got a horizontal
photo? No problem. Just crop it down to 4x4 and mount it on a
piece of cardstock. Is your 4x6 picture one that you don't want to crop? Mount a piece of cardstock over the pre-cut window, and then add your photo. It's easy to accommodate all of your favourite pictures.

Don't feel limited by the windows that are there. You can do so much with cardstock and a little creativity. Don't forget to add paper and embellishments to corners, sides and the bottom to make the album feel finished.


I am really happy to have captured these memories with this mini album. As we go through the teenage years, I know I will pull it out often to remind me of when he was CUTE. Tee hee.
KEEP HOPPING & LEAVE COMMENTS, PLEASE!
Your next stop on this Mini Album Blog Hop is Lucy's Creative Expressions blog.
Your next stop on this Mini Album Blog Hop is Lucy's Creative Expressions blog.
Please take the time to leave comments on our
posts, as we love to get feedback from our crafty readers ....whether it was
something that you really liked or some new technique that was used that you
would like to learn how to do....by leaving us comments, we get to hear what
you like, and what you want to see.
Thanks for hopping along with us - we hope we
were able to inspire you to get creative using some of the designs, paper and
techniques seen along the way. And come
back next month when we’ll be sharing some FUN summer projects!
Friday, June 12, 2015
I think I've said before how much I love washi tape. It's fun, colourful and versatile -- good for just about everything. And that includes CRUSHING.
Often, I use washi tape to make it look like I've just taped a photo or journaling spot onto the page. But on this spread, I took the washi tape a bit further.


Often, I use washi tape to make it look like I've just taped a photo or journaling spot onto the page. But on this spread, I took the washi tape a bit further.

Here, I used the washi over top of a Flip Flap, calling attention to the photo and journaling underneath.

And here, I ran it down the edge of the page, creating a border. But it also creates a bit of a bookmark, so I can find this spread easily in the future. It was a special day I want to remember.
But the uses for washi doesn't stop there. Washi can be more than an accent -- it can be the design on your page.

Here, I took a plainer page and attached strips of washi tape as the background. I love the colours and it really added pop to the page.
Come back throughout the month for more tips and tricks for your CRUSH books.
Want to learn more? Come out to my "52 Weeks of Happiness" Crush Workshop.
Want to learn more? Come out to my "52 Weeks of Happiness" Crush Workshop.
Thursday, June 11, 2015
Some of our most favourite memories are associated with food. So why not add that to your CRUSH book? One of my husband's favourite family recipes is for Lemon Orange Cake -- his Nanny used to make it for him as long as he can remember. And I think the memories of visits with his grandparents make this cake just as tasty as the cake itself.
Here, I've CRUSHED a piece of Lemon Orange cake that I made for Hubby's birthday, along with the recipe on a recipe card.

I inserted the recipe into a Flip Flap, so that we could see both sides of the recipe card. And then I hid some special journaling underneath the recipe card.


I kept the rest of the page simple, so that the recipe was the hero.
Don't have a recipe? Use the recipe format for other journaling. For example, if you're doing a page about a sweet girl in your life, maybe the recipe is:
Come back throughout the month for more tips and tricks for your CRUSH books.
Want to learn more? Come out to my "52 Weeks of Happiness" Crush Workshop.
Here, I've CRUSHED a piece of Lemon Orange cake that I made for Hubby's birthday, along with the recipe on a recipe card.

I inserted the recipe into a Flip Flap, so that we could see both sides of the recipe card. And then I hid some special journaling underneath the recipe card.


I kept the rest of the page simple, so that the recipe was the hero.
Don't have a recipe? Use the recipe format for other journaling. For example, if you're doing a page about a sweet girl in your life, maybe the recipe is:
1 cup of kindness
2 cups of cuteness
1/2 cup of freckles
A pinch of spunk.
Mix well and bake with love.
Come back throughout the month for more tips and tricks for your CRUSH books.
Want to learn more? Come out to my "52 Weeks of Happiness" Crush Workshop.
Tuesday, June 9, 2015
Lately, I've been crushing the things that make me happy -- from family recipes to special occasions to every day silliness. I love the freedom and unstructured creativity that comes with CRUSHING.
Here are some tips to make crushing faster, simpler, easier ... and super fun!
CRUSH Tip: Keep It Simple, Sweetheart. And keep it flat.
The beauty of Crush books is that they don't have to be over complicated. Simple photos. Simple embellishments. Simple techniques. You can really capture memories while you're on the go, or catch up quickly if you're behind. The pages are already beautiful, so you don't have to add much to create a gorgeous page. And simplicity helps your photos POP.
Another part of keeping things simple is keeping it FLAT. You don't want a lot of dimensional or hard embellishments bulking up your book. Because the pages are bound in, bulky bling can make it more difficult to work with future pages. It may also make your book as a whole too think and cumbersome. Keep your Crush books flat, light and uncluttered.

This layout is about my newly-decorated living room. It's my oasis and the place I want to go when I need to relax. So I just used a little bit of washi tape and a few simple stamps to embellish the pages. Journalling finishes it off.

This one page layout is all about my breakfast. Not too exciting for outsiders, but I like routine and I am a creature of habit. This page is a reflection of me and it makes me smile. Again, it's flat and simple, with a little washi, a few stamps and a little bit of me left on the page.
Come back throughout the month for more tips and tricks for your CRUSH books.
Want to learn more? Come out to my "52 Weeks of Happiness" Crush Workshop.
Friday, June 5, 2015
Close to my Heart isn’t just about
scrapbooking. You can create some
beautiful items for your home – they may just be beautiful pieces of art, or
they may be “display” memory keeping, or BOTH!
That’s what the Team Brae-er’s June Blog Hop is all about. Take a hop through our posts and see how my
fellow CTMH consultants have taken our products and used them to decorate our
homes!
ABOUT THE HOP
·
This is a circular hop so you can start here
and go all the way around.
·
Visit Brae’s “The Brae-er” blog for the
complete blog list if you get lost along the way.
HERE'S MY PROJECT: Later Sk8r Display Tray

Our Black Display Tray and Picture My
Life Cards go together so well. They
were just the colours I wanted to create a home décor memory keeping piece
about my son Charlie – and because the 4x3 cards fit perfectly in the 4x3
display boxes, it went together so easily.
I then used larger 4x6 cards and
larger photos to create focal points on the corners. I attached these over top of the tray using
Liquid Glass.
And then I embellished – shimmer trim, washi tape and white enamel stars were just the thing to add some pizzazz to this display
tray.
I have a large wall going down the
stairs and into my craft room in my home.
It is filled with family photos and this tray will be an amazing
addition to that collection.
** Funny story! I had this artwork on display at a vendor
show I worked recently. A little boy in
a Superman t-shirt (complete with cape) stopped dead in front of it. He pointed to the lightning bolt and said to
his mom, “Look! It’s the Flash!”. My hubby and kids are huge Marvel fans, so
this was a really appropriate comment.
It made me giggle. **
KEEP HOPPING & LEAVE COMMENTS, PLEASE!
Your next stop on this GET IT BEFORE IT’S GONE Blog Hop is Nicky's blog.
Your next stop on this GET IT BEFORE IT’S GONE Blog Hop is Nicky's blog.
Please take the time to leave comments on our
posts, as we love to get feedback from our crafty readers ....whether it was
something that you really liked or some new technique that was used that you
would like to learn how to do....by leaving us comments, we get to hear what
you like, and what you want to see.
Thanks for hopping along with us - we hope we
were able to inspire you to get creative using some of the designs, paper and
techniques seen along the way. And come
back next month when we’ll be sharing some FUN summer projects!
This month's special campaign features some great albums called My Crush. Good for travel, good for baby albums, good for "all about me" books -- they are fun, pretty and versatile. I'll be blogging all month about My Crush but while I'm working on some stuff to show you, check out this great video and introduce yourself to My Crush!
Check out my "deals" page for more info on the Summer Crush campaign.
Check out my "deals" page for more info on the Summer Crush campaign.
Wednesday, June 3, 2015
I love ice cream. My hubby loves ice cream. My kids LOOOOVE ice cream. We always have some of that cold, creamy goodness in our house. So when we went on our cruise last spring and there was a self-serve frozen yogurt machine right on the pool deck, we were all in HEAVEN.
This month's Stamp of the Month was deliciously perfect for a layout about the Fro-Yo machine. And the Blossom papers were the ideal colours -- nice and fresh and cool.
Take a look!

Like what you see? You can make this layout at my "One Layout, Two Looks" workshop on June 19. Learn more here.
And get your "Ice Cream Dream" stamp of the month for just $5 when you spend $50 or more this month! Details here.
Subscribe to:
Posts
(Atom)
Close to my Heart

See what I'm up to on Facebook!