Wednesday, June 15, 2011
Tear Bears are so cute with their round, soft faces. And so super easy to make. All you need is some paper, your fingers and some imagination (oh, and some glue too!). I especially love to make tear bears that peek over the edges of corners and tops of pages. Love love love.
And Tear Bears are the stars of my first Kids Klub workshop on Saturday, June 25 at 1:30pm -- where kids get to make a bookmark, teabag wallet, treat bag topper (with treats) and a hanging pennant for their teacher or some other special person. They'll be learning the tearing technique, as well as some random stamping. Here's a sample of what they'll be making:

Register your kids in the workshop for only $15 and you'll make a great, affordable gift just in time for the end of the school year. Everyone will be able to customize the colours and stamps they use so each will be very personal and a little bit different. Recommended for kids 8 and up -- moms also welcome.
Register today by emailing me at justscrapit@sympatico.ca
And Tear Bears are the stars of my first Kids Klub workshop on Saturday, June 25 at 1:30pm -- where kids get to make a bookmark, teabag wallet, treat bag topper (with treats) and a hanging pennant for their teacher or some other special person. They'll be learning the tearing technique, as well as some random stamping. Here's a sample of what they'll be making:

Register your kids in the workshop for only $15 and you'll make a great, affordable gift just in time for the end of the school year. Everyone will be able to customize the colours and stamps they use so each will be very personal and a little bit different. Recommended for kids 8 and up -- moms also welcome.
Register today by emailing me at justscrapit@sympatico.ca
Sunday, June 5, 2011
Another great sketch over at the Sweet Stop -- so inspiring that I did two cards using it! First, a set of thank you cards for my scrap club (you gals rock!) and a second, slightly simplified version for a set of cards as a gift. I used the CTMH Mayberry paper pack for both sets, plus the Mayberry stamp set on the first card, and a Suzie Soo stamp on the second.
Here's the first card, that follows the sketch. Added some faux stitching and an Opaques pearl for a classy but homey look.


Here's the first card, that follows the sketch. Added some faux stitching and an Opaques pearl for a classy but homey look.

And here's the second set:


Wednesday, June 1, 2011
Doing the Heart 2 Heart Challenge after some time away. Here are some little thank you cards that I made using the Sophia papers and Cotton Candy cardstock, and the "A Little Thanks" stamp set. I really like using paper to make faux pleated ribbon - CUTE! I want to make some more using Fanfare -- stay tuned!


I’ll be honest, I wasn’t all that interested in digital scrapbooking when we were first introduced to Studio J. I sit in front of a computer all day, and when it comes to scrapbooking, my passion is as much in the hands-on activity of it as in the final product. I love the glue, the glitter, the art of it all.
But let me tell you, once I tried it, I became a believer. It’s fast and it’s beautiful. You can be just as creative, with less mess! You can scrap outside in the backyard or at the cottage (as long as you have an internet connection). And you can change the size of your photo – bigger, smaller, bigger again – without getting … and paying for … multiple prints. If you've never tried digital scrapbooking before, I encourage you to give it a go -- playing is FREE!
BONUS! Right now, for the month of June, you can get a FREE JPEG file of one of your Studio J layouts. Normally, this is only a feature of our Studio J memberships. Take advantage of this special offer and you can share your layout with as many people as you want by posting on your family blog or sending it by email. There’s no minimum purchase! The hardest part will be choosing which one!
Need some help to get started? Come out to my FREE Studio J class on Friday, June 24 at 7pm. Bring your laptop with some digital photos and we’ll walk through the steps together. Just email me at justscrapit@sympatico.ca to reserve your spot.
Or watch this great video and see just how easy it is.
But let me tell you, once I tried it, I became a believer. It’s fast and it’s beautiful. You can be just as creative, with less mess! You can scrap outside in the backyard or at the cottage (as long as you have an internet connection). And you can change the size of your photo – bigger, smaller, bigger again – without getting … and paying for … multiple prints. If you've never tried digital scrapbooking before, I encourage you to give it a go -- playing is FREE!
BONUS! Right now, for the month of June, you can get a FREE JPEG file of one of your Studio J layouts. Normally, this is only a feature of our Studio J memberships. Take advantage of this special offer and you can share your layout with as many people as you want by posting on your family blog or sending it by email. There’s no minimum purchase! The hardest part will be choosing which one!
Need some help to get started? Come out to my FREE Studio J class on Friday, June 24 at 7pm. Bring your laptop with some digital photos and we’ll walk through the steps together. Just email me at justscrapit@sympatico.ca to reserve your spot.
Or watch this great video and see just how easy it is.
Wednesday, May 18, 2011
I am still recovering ... in a good way ... from our latest weekend in Mansfield. What a spectacular bunch of ladies we had, sharing ideas, stories and Cricut cartridges! Yes, those Cricuts were a-hummin' all weekend long. It's so nice to get away and do what I love to do -- scrapbook! And do it with 19 other gals who love it too.
I was so impressed and inspired by the artwork I saw. And of course, I was happy to complete 10 layouts myself.
But the very best part was simply the positivity, the friendship, the shared experience of it all.
The next 48 Hour Scrapathon is in September? Are you in?

I was so impressed and inspired by the artwork I saw. And of course, I was happy to complete 10 layouts myself.
But the very best part was simply the positivity, the friendship, the shared experience of it all.
The next 48 Hour Scrapathon is in September? Are you in?

Monday, March 21, 2011
It's really quite easy to take a sketch for a rectangle card and turn it "ROUND". Come out for a fun workshop where we'll make 12 round cards (2 each of 6 designs) for any occasion. Using some great stamps like "Circle Together" (one of my new faves) and a great spring-inspired colour combo, this workshop will have you spinning with excitement.

Email me at justscrapit@sympatico.ca to reserve your spot today! $30 per person

Email me at justscrapit@sympatico.ca to reserve your spot today! $30 per person
Wednesday, March 2, 2011
A fun way to express different view points in the same layout, this thought-bubble-inspired journaling technique can come in handy when scrapping an event that involved a number of people. And there are different ways to execute it too! The easiest and fastest way is to actually use thought bubbles or small strips of paper and write down what each person was thinking (or what you THINK they were thinking!).
But another way is to let each person have their own journaling block to tell his or her thoughts. On past family vacations, I’ve asked each person to write down what their favourite moment was – something similar can be done for this. I know, a novel idea to ask others for input into your layout, but it sure gives a different perspective to the story you’re telling.
Go ahead and put a bubble or two on your next layout.
EXAMPLE:

Standing outside Cows Ice Cream shoppe in Halifax.
Our thoughts:
SHERI (me – on the left): I can see the layout already! Ice CREEEEEEAM!
MICH (my sis – in the middle): What flavour will I have?
MOM (our mom – on the right): Enough pictures already! I want my ice cream. Two scoops please!
COW: Moooo!
Wednesday, February 23, 2011
One of my favourite CTMH products is Flip Flaps. It's a fantastic tool that helps you to add more pictures on your layouts. I used them A LOT in my Disney album when I just couldn't decide which pictures to use, but didn't want a layout just with pictures. They fit nicely wherever you have a 4x6 photo and you can use as many as you want.


You can use it to hide journaling, or add more pictures. So handy and so fun.
Want to learn how to use them? Come to my Interactive Layout workshop on March 5! Email me for details.


You can use it to hide journaling, or add more pictures. So handy and so fun.
Want to learn how to use them? Come to my Interactive Layout workshop on March 5! Email me for details.
Wednesday, February 16, 2011

Only $200 per person -- and it includes all your food, accommodations and a 6' table per person for your scrapbooking. No cleaning up. No cooking. No making your bed. You don't even have to get out of your pajamas!
Want to know more? Email me at justscrapit@sympatico.ca
This weekend is almost sold out! Register soon to get your space ... before they are all gone.
I fell in love with the colour combination on the cupcakes and it's always a good time for flourishes and swirls. Please enjoy this cute little card I made for my SIL's upcoming baby shower.


My Penny Black kitties always make me smile. And three great challenges came together to inspire this sweet card for my niece's 3rd birthday. Take a peek:

Go check out these great challenge blogs, if you haven't already:
Clean & Simple: Fall to Layout #127 Sketch
Penny Black Saturday: Pretty in Pink
Penny Black at Allsorts: Feb. Challenge Say It With Flowers

Go check out these great challenge blogs, if you haven't already:
Clean & Simple: Fall to Layout #127 Sketch
Penny Black Saturday: Pretty in Pink
Penny Black at Allsorts: Feb. Challenge Say It With Flowers
I love love love this little boy on a trike stamp from Stampin Bella and this week's sketch helped me to keep the card simple and really emphasize this cutie patootie. I hope you don't mind that I moved the button from top left to bottom right -- just felt better with the flow.

Products are all Close to my Heart -- including the awesome canvas button that I stamped Happy Birthday on -- except the boy stamp and the copics I used to colour.
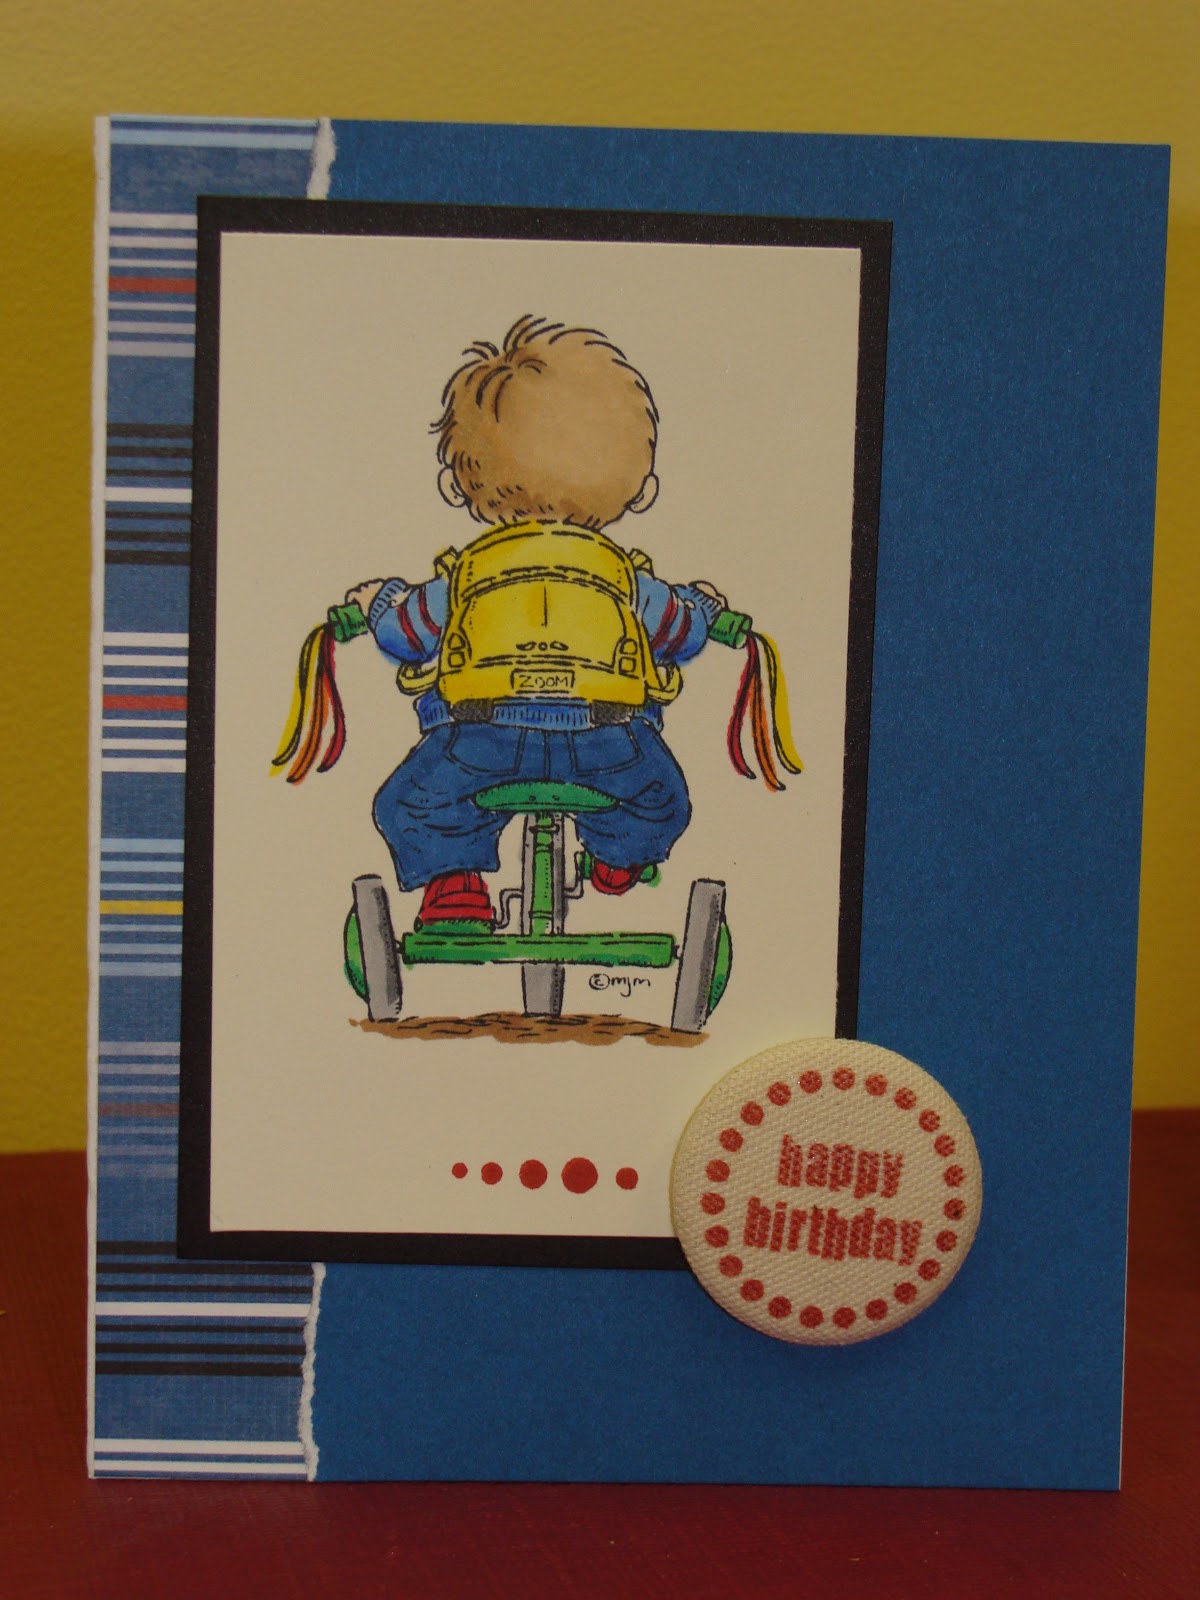
Products are all Close to my Heart -- including the awesome canvas button that I stamped Happy Birthday on -- except the boy stamp and the copics I used to colour.
Like many of you, I'm sure, I made the resolution (again) to set aside time for my own scrapbooking. Not working on class demos, not working on swaps or blog challenges -- my very own scrapbooking time. Well, it's already halfway through February -- have you kept your resolution?
I find that it works best for me if I schedule the time. Mark it on the calendar. Make a date with friends to scrapbook. Sign up for a class. Clearly assign the time for "me". That way, nothing else gets scheduled in. And I don't just leave it to chance, which I can easily "excuse" myself from.
This weekend, two of my scrappy friends are coming over and we're going to scrap the day away. It's helping me get through the week, and I'm really excited to have the time with them ... and my scrapbooks.
Here's hoping you're keeping up with your resolution to find time for YOU!
I find that it works best for me if I schedule the time. Mark it on the calendar. Make a date with friends to scrapbook. Sign up for a class. Clearly assign the time for "me". That way, nothing else gets scheduled in. And I don't just leave it to chance, which I can easily "excuse" myself from.
This weekend, two of my scrappy friends are coming over and we're going to scrap the day away. It's helping me get through the week, and I'm really excited to have the time with them ... and my scrapbooks.
Here's hoping you're keeping up with your resolution to find time for YOU!
Thursday, February 10, 2011
If you want to use multiple colours on your stamps, here's one way to do it: instead of using an ink pad, use markers!
Start with your acrylic stamp and one marker. I've used Tulip red on a heart. Colour where you want that shade to go.


Then colour with your second (brown) and third (pink) colours.
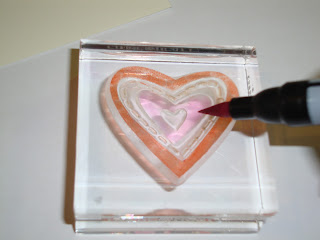
Then, when you're ready to stamp, there's one more thing to do: HUFF! That's right, gently "huff" a breath on the stamp to re-activate the ink with the moisture in your breath.
 Then stamp on your cardstock.

It may take a little practice but it's an easy and economical way to add some multiple colours to your stamping.
Start with your acrylic stamp and one marker. I've used Tulip red on a heart. Colour where you want that shade to go.


Then colour with your second (brown) and third (pink) colours.

Then, when you're ready to stamp, there's one more thing to do: HUFF! That's right, gently "huff" a breath on the stamp to re-activate the ink with the moisture in your breath.


It may take a little practice but it's an easy and economical way to add some multiple colours to your stamping.
Wednesday, February 2, 2011
I had lots of fun with this cute sketch and the challenge of making the accents wrap in a "swoosh" pattern. I love using ribbon and was so happy I could these cute little clothes pegs. The little boy stamp is from Stampin' Bella -- so cute and coloured with Copics. The paper is CTMH Fanfare, Cranberry and Buttercup CS. This will be the perfect card for my little nephew who just turned 6.


I have a lot of birthday cards to make, and this weeks' H2H sketch really inspired me. I should have gone to bed after the first card, but really wanted to make another. So here they are.
The first uses new Sophia paper and the Party Pennants stamp set. I added some movement with some beads and black waxy flax.
 The second uses paper from the Sweetheart paper pack, plus the green dots from Sophia. The Candlelight stamp set worked beautifully for a candle spotlight treatment. Add some ink from the spray pen, some sparkles and some ribbon and it turned into a really cute card.
The first uses new Sophia paper and the Party Pennants stamp set. I added some movement with some beads and black waxy flax.

Come join me for a great workshop on February 12. For just $30, you can make 10 gorgeous birthday cards (2 of each design). We'll be using our new Mayberry papers, and the beary, beary adorable Beary stamps. You don't want to miss it.
RSVP today because there are only 4 spaces left.

RSVP today because there are only 4 spaces left.

Well, almost ready. It's been a lot of good, hard work but my new workshop reno is complete -- all I have to do is finish "moving in". Here you'll see the workshop space, counters and cupboards (where my Cricut will soon live), and Ikea shelving for all my stamps and CMTH embellishments. The floors are FANTASTIC laminate and are such an improvement from the yucky carpet that was there before. Lastly, I have a great cube unit that will soon hold all my scrapbooking, stamping and cardmaking magazines, along with my albums and how-to books.


I still want to put up some artwork and have some self-adhesive quotes to add. All in good time!
Come see it for yourself! I will be having open crops and workshops in this space -- come play with me!


I still want to put up some artwork and have some self-adhesive quotes to add. All in good time!
Come see it for yourself! I will be having open crops and workshops in this space -- come play with me!
When we're scrapbooking, sometimes it's hard to be frugal in the name of design. Here's a tip to help you save paper when you need large pieces of cardstock, layered one upon the other.
Here's a layout I did featuring my hubby and I on our wedding day. Hard to believe that was almost 15 years ago! Anyways, as you can see, this layout uses 3 large pieces of cardstock -- 1 New England Ivy (dark green -- hope you can see it in the photo), 1 Sweet Leaf (light green) and 1 Colonial White.


It seemed a waste to use so much cardstock when so little of the base layers would be seen. So here's a tip to save paper: cut out the center of the base cardstock and create a sort of "reverse" frame.
Like so:

The size of the "hole" depends on how comfortable you are with your cutting, and how big the piece is that's going on top.
Then you can use those pieces for other parts of this layout, or save it to make cards or other layouts. I used them to mat my photos.

Here's a layout I did featuring my hubby and I on our wedding day. Hard to believe that was almost 15 years ago! Anyways, as you can see, this layout uses 3 large pieces of cardstock -- 1 New England Ivy (dark green -- hope you can see it in the photo), 1 Sweet Leaf (light green) and 1 Colonial White.

Here's a bit of a close-up:

It seemed a waste to use so much cardstock when so little of the base layers would be seen. So here's a tip to save paper: cut out the center of the base cardstock and create a sort of "reverse" frame.
Like so:

Then you can use those pieces for other parts of this layout, or save it to make cards or other layouts. I used them to mat my photos.

Try it the next time you do a large, layered layout and make your paper stretch.
Sunday, January 9, 2011
Cupcakes are always yummy -- and these ones got my creative juices going. I really liked the white silhouettes, which means I got to play with my embossing powders. This isn't a baby themed card but the colours really spoke to me. Fun, and it's doubling as a b-day card for my brother-in-law! Happy Birthday!


Subscribe to:
Posts
(Atom)
Close to my Heart

See what I'm up to on Facebook!


