Friday, August 23, 2013
Welcome to Color My Heart's Color Dare #57. This week, we're playing with Pacifica and Sky -- two colours that are shades of each other for a monochromatic look.

Give it a try and enter this week's Colour Dare! Make your own project -- scrapbook layout, card or 3D creation -- using just these two colours. Then enter it here for your chance to win bragging rights.
Here's my creation:

This card was made using CTMH's adorable new spinner card bases. The center snowman spins around to finish the sentiment (Love never melts) and create an awesome interactive experience. The snowmen are from the popular "Flakey Friends" stamp set and the flourishes are from also popular "Love Life" set -- two sets that are so versatile and well loved in my collection. I topped it off, literally, with liquid applique on the snowmen's hats.
Do I have you inspired? Get out your Pacifica and Sky coloured supplies and play along with us at Color My Heart Color Dare!
Friday, August 16, 2013
For this week's Color Dare, we're using three of my favourite colours: Lagoon, Pear and Buttercup. Will you play along with us?

I had been playing with one of the new Hostess Rewards sets already and thought that they would make adorable 3x3 cards/tags. The colour combo gives it a real "tropical Christmas" feel!
Here they are:

I had been playing with one of the new Hostess Rewards sets already and thought that they would make adorable 3x3 cards/tags. The colour combo gives it a real "tropical Christmas" feel!
Here they are:
 |
| Aren't they super cute? |
OK, I have a real soft spot for penguins, so these just make me giggle. :) I jazzed up the cards with some flourishes from "Love Life", and an Aquadot on the side. Simple but they do the trick.
Don't forget to check out Color Dare #56 and play along! I look forward to seeing your creations!
Thursday, August 15, 2013
Welcome to our August Blog Hop
featuring some of our great products made with kraft paper and products. This sturdy material takes ink wonderfully and helps to make some projects with a warm and cozy feel. There's just so much you can do! I'm also featuring the August Stamp of the Month, "A Chocolate Affair", which you can get for FREE this month with a purchase of $50 or more. Personally, I think the only thing better than chocolate is FREE chocolate LOL!
ABOUT THE HOP
- This is a circular hop so you can start here and go all the way around
- If you came from the fabulous Krista's Simply Creating blog, then you are going in the right direction!
- And if you want to follow us from coast to coast, then please start at the beginning with Michelle S.’s blog “My Creations With Michelle”. The complete blog list is also found here if you get lost along the way.
********
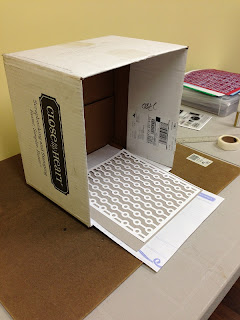
MY PROJECT: Kraft Ring Box as a Chocolate-y Gift

This is my Kraft ring box. I cut an overlay using the **new** Artbooking Cricut cartridge, and used it as a stencil. I sponged Chocolate ink over top to create this soft and wonderful pattern all over the box. Then I embellished with the Chocolate Affair stamp and Babycakes polka dotted paper. The pennant, "Sweet", is also cut from Artbooking on Sunset cardstock and backed with a scrap of Kraft paper.

I also made a cute card using the same techniques. This card was inspired by a sketch in Make It from Your Heart Volume 2, sketch # 20.
Here is the inside of the box, which I also decorated:

The Babycakes paper is so cute, I had to use it inside too. And I added the sentiment too, as a reminder that we all need a little chocolate in our life. :) Mmmmm, chocolate.
***********
KEEP HOPPING & LEAVE COMMENTS, PLEASE!
Your next stop on the Cross Canada
Hop is the crafty Twirl 'n' Time blog.
Please take the time to leave
comments on our posts, as we love to get feedback from our viewers....whether
it was something that you really liked or some new technique that was used that
you would like to learn how to do....by leaving us comments, we get to hear
what you like, and what you want to see.
Thanks for hopping along with
us - we hope we were able to inspire you to get creative using some of the
designs, paper and techniques seen along the way. Join us again in September when
we will be going retro and featuring stamps from Jeanette Lynton's Archives We hope you will join us again
on September 15th.
Tuesday, August 13, 2013
Glue dots are awesome things that I keep in my tool box. They are great for attaching ribbon, buttons, metal accents and more to your layouts and cards. But did you know that they could be an embellishment all on their own?
Here are the steps to make glittery polka dots on your projects using Glue Dots!

STEP ONE: Prep your supplies!

Start by stamping your images and getting your paper cut to make your project.
STEP TWO: Add the glue dots!

If you look closely, you can see the glue dots on the penguin's ear muffs.
STEP THREE: Add the glitter!


You can also put glue dots and glitter on your patterned paper too!
STEP FOUR: Make your cards!


Here are the steps to make glittery polka dots on your projects using Glue Dots!

STEP ONE: Prep your supplies!

Start by stamping your images and getting your paper cut to make your project.

If you look closely, you can see the glue dots on the penguin's ear muffs.
STEP THREE: Add the glitter!


You can also put glue dots and glitter on your patterned paper too!
STEP FOUR: Make your cards!


Friday, August 9, 2013
Title: Spray and Overlay Tutorial: Creating backgrounds for your layouts
Hostess: justscrapit_sb Sheri
Keyword: TechVSBN01
Day/Date: Friday, August 9, 2013
Time: 7Pm EST
Creating a soft and funky background is easy and fun! Just grab a stencil -- or make one yourself with your favourite diecut machine -- and a spray pen, or a sponge and ink. Here are the steps:
STEP ONE: Creating the stencil
If you don't have a store-bought stencil, you can make one! Simply cut a full page overlay on your Cricut, or use the Auto Fill function to cut as many of one shape on a 12x12 sheet as possible. Keep the negative shapes -- you might be able to use them later on this project, or on another project.

STEP TWO: Fill your spray pen
I filled my spray pen to the 7th line with water, then added Slate reinker to fill it up to the 9th line. I had to refill this a second time for the second page. Just do the same steps.

STEP THREE: Prepping to Spray
Place your base cardstock in a cardboard box, on top of a piece of large scrap paper. Lay your stencil or overlay on top. Make sure it lays flat. Using the box helps you to contain any excess spray and minimize the mess.
STEP FOUR: Spraying
Hold your spray pen approximately 12" away and start spraying. Cover the entire page with sprayed ink. Remove the overlay.


STEP FIVE: Let Dry
If you spray a lot, your base page will be a little wet. Leave it for 10 minutes to dry. By the time you have your other layout pieces and photos cut, your pages will be dry.

REPEAT FOR YOUR SECOND BASE PAGE
If you don't have a spray pen, or don't want to use it, you can use a sponge and ink pad to apply the ink to your page. Be careful not to press too hard, and make sure your overlay/stencil doesn't move. Sponge the page until you have the intensity of colour you want.
HERE IS THE LAYOUT I CREATED USING THESE BACKGROUND PAGES

If you have any questions, please leave a comment below or email me at justscrapit@sympatico.ca
Hostess: justscrapit_sb Sheri
Keyword: TechVSBN01
Day/Date: Friday, August 9, 2013
Time: 7Pm EST
Creating a soft and funky background is easy and fun! Just grab a stencil -- or make one yourself with your favourite diecut machine -- and a spray pen, or a sponge and ink. Here are the steps:
STEP ONE: Creating the stencil
If you don't have a store-bought stencil, you can make one! Simply cut a full page overlay on your Cricut, or use the Auto Fill function to cut as many of one shape on a 12x12 sheet as possible. Keep the negative shapes -- you might be able to use them later on this project, or on another project.

STEP TWO: Fill your spray pen
I filled my spray pen to the 7th line with water, then added Slate reinker to fill it up to the 9th line. I had to refill this a second time for the second page. Just do the same steps.

STEP THREE: Prepping to Spray
Place your base cardstock in a cardboard box, on top of a piece of large scrap paper. Lay your stencil or overlay on top. Make sure it lays flat. Using the box helps you to contain any excess spray and minimize the mess.

STEP FOUR: Spraying
Hold your spray pen approximately 12" away and start spraying. Cover the entire page with sprayed ink. Remove the overlay.


STEP FIVE: Let Dry
If you spray a lot, your base page will be a little wet. Leave it for 10 minutes to dry. By the time you have your other layout pieces and photos cut, your pages will be dry.

REPEAT FOR YOUR SECOND BASE PAGE
If you don't have a spray pen, or don't want to use it, you can use a sponge and ink pad to apply the ink to your page. Be careful not to press too hard, and make sure your overlay/stencil doesn't move. Sponge the page until you have the intensity of colour you want.
HERE IS THE LAYOUT I CREATED USING THESE BACKGROUND PAGES

This layout features my little boy Charlie. He is now 8 years old, but he's always loved music. Even now, he can sit for hours just listening to his iPod. These pictures were taken when he snuck into his big brother's room to listen to his CD walkman. Good thing he didn't get caught!
SUPPLIES USED: All supplies are Close to my Heart
ProPlayer Paper Pack, including B&T paper, and cardstock (Slate, Whisper, Pacifica and White Daisy)
ProPlayer Assortment (embellishments)
Artbooking and Art Philosophy Cricut Cartridges, only available from CTMH
Make It from Your Heart Volume 2 Layout Sketch book, Layout #12
Slate ink and re-inker
Black, Pacifica and Ruby ink
Stamp Sets: Framework Alphabet, Tech Speak and All the Details
Slate Striped Twist Ties
Spray pen
Bonding Memories Glue
Hooray! It's my first post as a Design Team member over at Color My Heart Color Dare Challenge. I've worked hard (well, played hard) to create an amazing 4-page layout to share with you, using this week's colours: the colours from the stylish and **NEW** Laughing Lola papers.

After you take a look at what I've done, go and head over to the Color Dare blog to see what the rest of our talented Design Team came up with. Then play along for your chance to win bragging rights!
My Splitsville Layout using Laughing Lola
This week, I chose to do a 4-page layout. Yes, 4 pages. I took a trick from veteran CTMH consultant Lynn Como and used one of our True Fit Folios (X1404) as a giant 12x12 flip flap so that I could fit in more photos!
Here's the layout when it's "closed":

And here's the layout when it's "open":

For all 4 pages, I used Pattern #14 from the **NEW** Make It from Your Heart Volume 2 layout pattern book. I also used the **NEW** Artbooking Cricut Cartridge to create the Gypsy overlays, the photo frame, the title and the icons.

And I love how it all turned out. This layout is close to my heart (no pun intended) because it documents a special moment on our recent vacation. We were fortunate enough to meet up with some friends from high school who we hadn't seen in 12 years. It was great to meet their whole family and catch up ... and it was so comfortable and natural, it felt like we'd only been apart 12 minutes, instead of 12 years.
The Lola papers worked really well with the vintage-y feel of the bowling alley where we met, and it just goes to show you that stylish, girly papers don't have to be used for a girly page.
Don't forget to go to the Color Dare blog and try your hand at this week's challenge. Make a card, layout, home decor item or any kind of project you wish, using the Laughing Lola colours, or whatever colours you have that come close. Link it up to the blog and enter for a chance to win!
*******
Want to see what else you can do with Lola! Laughing Lola is my feature kit of the month. Pop over to my Kit of the Month page and see the amazing Lola Workshop on the Go layouts I've created.
Wednesday, August 7, 2013
August is a great month to check out our Stamp of the Month. Not only are we offering a SUPER CUTE stamp set, called "A Chocolate Affair". But for August only, you can get it for FREE!

Shopping is easy! Just send me an email with your purchase list, and I will place the order for you on my next order date. This is ideal if you have any questions or need help with your order, or if you are placing a smaller order and want to save a little bit on shipping.
OR, you can shop online from the comfort of your home at my online business site: justscrapit1.ctmh.com. Bookmark this page and come back any time you shop.

Simply spend $50 on fabulous new products, and this stamp is yours, absolutely free!
What a sweet deal!
Shopping is easy! Just send me an email with your purchase list, and I will place the order for you on my next order date. This is ideal if you have any questions or need help with your order, or if you are placing a smaller order and want to save a little bit on shipping.
OR, you can shop online from the comfort of your home at my online business site: justscrapit1.ctmh.com. Bookmark this page and come back any time you shop.
Tuesday, August 6, 2013
Sometimes, your journaling can take on a more "math-like" format. Now, as a creative type, this is one of the few times that I will recommend that you do Math (certainly not my favourite) but it makes your journaling very easy.
Take this photo from this past weekend for example:

The journaling for this photo could be:
You can have a lot of fun playing around with the symbols to make the equation even more graphic and funky looking.
Go ahead and try it on your next layout!
Take this photo from this past weekend for example:

The journaling for this photo could be:
Daddy + (Kids x3) + Pool = Water Wrestling
You can have a lot of fun playing around with the symbols to make the equation even more graphic and funky looking.
Go ahead and try it on your next layout!
Subscribe to:
Posts
(Atom)
Close to my Heart

See what I'm up to on Facebook!

