Thursday, May 23, 2013
This past weekend, the weather was glorious! I love the sunshine and smells in the air at this time of year. Seeing all the plants starting to come back to life rejuvenates my soul.
Then the rain came and it's been grey and gloomy all week. So I thought I'd create a touch of sunshine for myself with this CTMH Colour Combination: Cotton Candy, Sunset and Honey.
And here's what I created:

I used the stamp set "Bright Sunshiny Day" on this card -- it is quickly becoming one of my go-to stamp sets. And I used a Card Sketch from one of CTMH's how-to books "Originals". Check out "Sweet and Simple" on page 108. I accented the circle with pierced dots and embellished with CTMH's Glitter Gems. I don't know about you, but this card just makes me smile.
Wednesday, May 22, 2013
One of my favourite ways to write the journaling for a scrapbook layout is to NOT write the journaling. At least, not all by myself. When possible, I get others to add their thoughts and memories too. This really helps to give different perspectives of the event and gets everyone involved.
Here is a layout I did for a large family vacation at the cottage. My family was there, along with my in-laws, and my husband's brother and sister and their families.

At the end of the weekend, I handed out slips of paper and asked each person to write down their favourite moment.

Then I created a folder to hold all of the papers and tucked it inside a pocket in the layout.


The next time you have a large group together, hand out paper or recipe cards and get them to write their thoughts and feelings. Then add them to your layout in a creative way.
Here is a layout I did for a large family vacation at the cottage. My family was there, along with my in-laws, and my husband's brother and sister and their families.


Then I created a folder to hold all of the papers and tucked it inside a pocket in the layout.


The next time you have a large group together, hand out paper or recipe cards and get them to write their thoughts and feelings. Then add them to your layout in a creative way.
This colour combination (Pear, Lagoon and Juniper) really speaks to me. It makes me think of water and the ocean. But I tried to go beyond my first reaction and create something a little different. My dear hubby's birthday is this weekend and this colour combo made for a great birthday card for him.
I used two of the Perfect Fit stamp sets to make this card. I love these sets as they have great little icons that can be used in so many different ways. For my hubby's card, the golf ball, BBQ and cake really sums up all that he would want his birthday to be.
 |
| OK, I cheated. I subbed Lagoon for the "Mint" in Dream Pop. Wink, wink. |
I used two of the Perfect Fit stamp sets to make this card. I love these sets as they have great little icons that can be used in so many different ways. For my hubby's card, the golf ball, BBQ and cake really sums up all that he would want his birthday to be.
 |
| Perfect Fit Stamp Sets -- for Mom, Dad and Birthdays. Just $13.95 each! |
Wednesday, May 15, 2013
Welcome to our May Blog Hop featuring the Close to my Heart Canvas Display. It is a great way to create a piece of artwork that you can display in your home, or give as a gift to someone special. Read on to see my "Canvas with a Splash", featuring our Surf's Up paper and shots of my family enjoying our new pool!
Close to my Heart offers 2 sizes of canvas to purchase: a 12x12 canvas comes in an exclusive WOTG Kit, complete with directions, an exclusive stamp set and Embellishments for only $39.95. We also offer a smaller 6x6 canvas for just $4.95. And lastly, any CTMH products can be used on artist canvases that you get from the arts and crafts store.
ABOUT THE HOP
MY SURF'S UP CANVAS

This canvas display showcases one of my favourite moments of last summer. We had family visiting from Toronto and from Halifax and we were trying to get the most from our new pool. These pictures feature the five cousins, and I love the "action" shot of them jumping into the the pool.
I used a 12x12 canvas purchased from the craft show. The first thing I did was was mix up some reinker and pearl paint in my spray pen and gently sprayed the top right and bottom left corner. The spatter turned out great, but I had to make sure to let it dry overnight.
Then I wanted to add some punches of colour but I also wanted to keep it simple. The Surf's Up paper pack was perfect, and I had some scraps left over from another project. I inked the edges with Chocolate ink to give some added umph, and curved the pieces over the sides of the canvas so it makes it look like the artwork continues on and on. The zipstrip with the beach balls placed across the center of the canvas added a perfect touch. I embellished some of the beach balls with Liquid Glass.
I also embellished the canvas with a black sparkle flourish and blue sparkles. They shine like the water did that day! I love it!

And finally, I jazzed up the simple title, cut using the font on the Cricut Artiste cartridge with some black sparkles to mirror the flourish.

**************************
YOUR NEXT STOP
Keep on hopping! Your next stop on the Cross Canada Hop is the talented Brae's "The Brae-er" blog.
Please take the time to leave comments on our posts, as we all love to get feedback from our viewers. Maybe it was something that you really liked or some new technique that was used that you would like to learn how to do, or you just want to leave words of encouragement. By leaving us comments, we get to hear what you like, and what you want to see. Thank you!
Thanks for hopping along with us. We hope we were able to inspire you to create your own Canvas projects using some of the designs, paper and techniques seen along the way.
Close to my Heart offers 2 sizes of canvas to purchase: a 12x12 canvas comes in an exclusive WOTG Kit, complete with directions, an exclusive stamp set and Embellishments for only $39.95. We also offer a smaller 6x6 canvas for just $4.95. And lastly, any CTMH products can be used on artist canvases that you get from the arts and crafts store.
ABOUT THE HOP
- This is a circular hop so you can start here and go all the way around
- If you came from the crafty Arlene’s “Creative Space” blog, then you are going in the right direction!
- And if you want to follow us from coast to coast, then please start at the beginning with Michelle S.’s blog “My Creations With Michelle”. The complete blog list is also found here if you get lost along the way.
MY SURF'S UP CANVAS

This canvas display showcases one of my favourite moments of last summer. We had family visiting from Toronto and from Halifax and we were trying to get the most from our new pool. These pictures feature the five cousins, and I love the "action" shot of them jumping into the the pool.
I used a 12x12 canvas purchased from the craft show. The first thing I did was was mix up some reinker and pearl paint in my spray pen and gently sprayed the top right and bottom left corner. The spatter turned out great, but I had to make sure to let it dry overnight.
Then I wanted to add some punches of colour but I also wanted to keep it simple. The Surf's Up paper pack was perfect, and I had some scraps left over from another project. I inked the edges with Chocolate ink to give some added umph, and curved the pieces over the sides of the canvas so it makes it look like the artwork continues on and on. The zipstrip with the beach balls placed across the center of the canvas added a perfect touch. I embellished some of the beach balls with Liquid Glass.
I also embellished the canvas with a black sparkle flourish and blue sparkles. They shine like the water did that day! I love it!

And finally, I jazzed up the simple title, cut using the font on the Cricut Artiste cartridge with some black sparkles to mirror the flourish.

**************************
YOUR NEXT STOP
Keep on hopping! Your next stop on the Cross Canada Hop is the talented Brae's "The Brae-er" blog.
Please take the time to leave comments on our posts, as we all love to get feedback from our viewers. Maybe it was something that you really liked or some new technique that was used that you would like to learn how to do, or you just want to leave words of encouragement. By leaving us comments, we get to hear what you like, and what you want to see. Thank you!
Thanks for hopping along with us. We hope we were able to inspire you to create your own Canvas projects using some of the designs, paper and techniques seen along the way.
Tuesday, May 14, 2013
One of my favourite techniques is something I learned from a Close to my Heart Workshop on the Go kit. The technique takes a CTMH My Acrylix(tm) stamp and uses it to create a border on the base pages of a layout. The stamp doesn't even have to be one created especially for borders -- any stamp with a pattern will work!
I'm not usually one to distress or treat my base pages differently. But sometimes, even your base pages need a little "umph"! Like this one:


 So with some Desert Sand ink, I stamped around the edges of my entire 2-page layout. I was deliberate in not stamping the full image, going off the edges on purpose.


 Now I love this layout and this kit even more!
Try some border stamping on your next layout and see what happens. It can really add some interest to your artwork.
I'm not usually one to distress or treat my base pages differently. But sometimes, even your base pages need a little "umph"! Like this one:


This is the main layout from the Tommy Workshop on the Go. I love how it turned out but felt that I could do a little more. The edges needed some pizzazz.
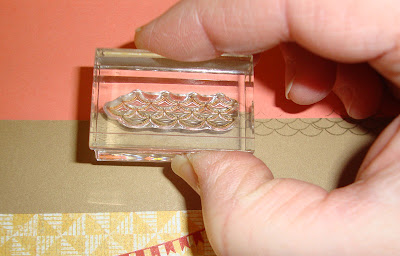
So I looked at the stamp set that comes with this kit, and there was the perfect border stamp. The waves really called to me!


Knowing what to do in the corners is always a tricky question. Since these waves started looking like fishing nets, I didn't mind that they overlapped in the corners. In fact, I think that added more depth and gave it a fabulous look.
Now, doesn't this look better?


Try some border stamping on your next layout and see what happens. It can really add some interest to your artwork.
Thursday, May 9, 2013
Welcome to today's colour challenge. I love trying out new combinations and this one -- Ruby, Sorbet and Blush -- felt particularly spring-like to me, and it made me smile. Especially when I paired it with this month's Stamp of the Month "Pinwheel".
When I made these cards, I was supposed to be doing other things. But life has been very busy, and it's going to continue for the rest of this month, so I took a wee creating break for myself. And here's what I came up with.
Card #1: World Go Round

Card #2: Nice Day


When I made these cards, I was supposed to be doing other things. But life has been very busy, and it's going to continue for the rest of this month, so I took a wee creating break for myself. And here's what I came up with.
Card #1: World Go Round

I was going for a clean, simple look with this card. The colours look wonderful and the spotlight in the centre really draws your focus to the pinwheel and the sentiment. I double stamped the pinwheel -- first and second generation -- to give a sense of motion.
I think I will use this card for Mother's Day this weekend -- because my Mom means the world to me!
Card #2: Nice Day

This card makes me smile. Random stamping was one of the first stamping techniques I ever learned, and it's still one of my favourite. I stamped the stars in Blush and Sorbet on White Daisy cardstock and matted it with Ruby. This card layout is #22 from "Make It From Your Heart", one of our amazing how-to books. I inked the edges of the Ruby rectangle and stamped the sentiment in Ruby ink. Then I created the dimensional pinwheel. I used a lollipop stick to make it stand out. And I added a touch of liquid glass on top of the red brad to make it shine.

What will you make with this colour combination? Share photos of your creations on my Facebook page!
Friday, May 3, 2013
Through the Smiley Team, who makes cards for the kids at SickKids Hospital, I met a very talented cardmaker, Lisa, the Fairy Cardmaker. She has made a lovely card, using the Close to My Heart Card Word Puzzle stamp set, which is one of my favourite cardmaking stamps. Here it is:
Lisa has coloured the rose beautifully, and the red really, really pops and looks stunning against the neutral colours on the rest of the card. The flourish helps to draw your eye in further and the scalloped border gives it a soft, girly feel. Her simple sentiment, using the words in the Card Word Puzzle stamp set, gets the feeling across without overpowering the card. And the little red gems add a glittery finishing touch.
Click on the link to see more of Lisa's amazing hand made greeting cards ... and even buy some!
I was so inspired by Lisa's card, that I tried making one of my own using this versatile stamp set, and our special promo paper Dream Pop. Take a look:

I was really happy with how this card turned out. I was able to use the paper in such a way that made the most of the pre-printed sentiment and complimented it with pops of colour, just like Lisa did with her rose. I used a flower from the stamp set too -- but kept it neutral in contrast to the rest of the card. And I put the sentiment "puzzle pieces" together to create a heartfelt message. A pink glitter gem on the flower adds the final touch.
Check out how you can get the Deam Pop papers, and maybe even win over $100 in prizes here.
Want to know more about this stamp set? Check out all the words and images you can puzzle together for your cardmaking needs.

One last tip. When you have these individual words, it can be difficult to line them up perfectly and keep them straight. That's where the CTMH My Acrylix blocks come in. Each CTMH block has an etched line along one edge, that is perfect for lining up sentiments or alphabet letters and helping you stamp straight. This etched line, along with the beveled sides, make the CTMH blocks a step above the rest.
To get this stamp set and some CTMH My Acrylix blocks, contact me at justscrapit@sympatico.ca or shop online!
 |
| To see more views of Lisa's card, click here. |
Click on the link to see more of Lisa's amazing hand made greeting cards ... and even buy some!
I was so inspired by Lisa's card, that I tried making one of my own using this versatile stamp set, and our special promo paper Dream Pop. Take a look:

Check out how you can get the Deam Pop papers, and maybe even win over $100 in prizes here.
Want to know more about this stamp set? Check out all the words and images you can puzzle together for your cardmaking needs.

One last tip. When you have these individual words, it can be difficult to line them up perfectly and keep them straight. That's where the CTMH My Acrylix blocks come in. Each CTMH block has an etched line along one edge, that is perfect for lining up sentiments or alphabet letters and helping you stamp straight. This etched line, along with the beveled sides, make the CTMH blocks a step above the rest.
 |
| Look closely and see the etched line along the bottom of the block. |
To get this stamp set and some CTMH My Acrylix blocks, contact me at justscrapit@sympatico.ca or shop online!
Subscribe to:
Posts
(Atom)
Close to my Heart

See what I'm up to on Facebook!

