Friday, August 9, 2013
Title: Spray and Overlay Tutorial: Creating backgrounds for your layouts
Hostess: justscrapit_sb Sheri
Keyword: TechVSBN01
Day/Date: Friday, August 9, 2013
Time: 7Pm EST
Creating a soft and funky background is easy and fun! Just grab a stencil -- or make one yourself with your favourite diecut machine -- and a spray pen, or a sponge and ink. Here are the steps:
STEP ONE: Creating the stencil
If you don't have a store-bought stencil, you can make one! Simply cut a full page overlay on your Cricut, or use the Auto Fill function to cut as many of one shape on a 12x12 sheet as possible. Keep the negative shapes -- you might be able to use them later on this project, or on another project.

STEP TWO: Fill your spray pen
I filled my spray pen to the 7th line with water, then added Slate reinker to fill it up to the 9th line. I had to refill this a second time for the second page. Just do the same steps.

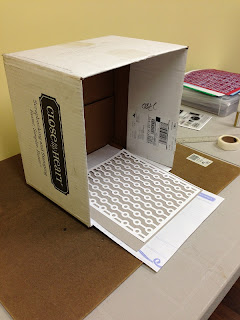
STEP THREE: Prepping to Spray
Place your base cardstock in a cardboard box, on top of a piece of large scrap paper. Lay your stencil or overlay on top. Make sure it lays flat. Using the box helps you to contain any excess spray and minimize the mess.
STEP FOUR: Spraying
Hold your spray pen approximately 12" away and start spraying. Cover the entire page with sprayed ink. Remove the overlay.


STEP FIVE: Let Dry
If you spray a lot, your base page will be a little wet. Leave it for 10 minutes to dry. By the time you have your other layout pieces and photos cut, your pages will be dry.

REPEAT FOR YOUR SECOND BASE PAGE
If you don't have a spray pen, or don't want to use it, you can use a sponge and ink pad to apply the ink to your page. Be careful not to press too hard, and make sure your overlay/stencil doesn't move. Sponge the page until you have the intensity of colour you want.
HERE IS THE LAYOUT I CREATED USING THESE BACKGROUND PAGES

If you have any questions, please leave a comment below or email me at justscrapit@sympatico.ca
Hostess: justscrapit_sb Sheri
Keyword: TechVSBN01
Day/Date: Friday, August 9, 2013
Time: 7Pm EST
Creating a soft and funky background is easy and fun! Just grab a stencil -- or make one yourself with your favourite diecut machine -- and a spray pen, or a sponge and ink. Here are the steps:
STEP ONE: Creating the stencil
If you don't have a store-bought stencil, you can make one! Simply cut a full page overlay on your Cricut, or use the Auto Fill function to cut as many of one shape on a 12x12 sheet as possible. Keep the negative shapes -- you might be able to use them later on this project, or on another project.

STEP TWO: Fill your spray pen
I filled my spray pen to the 7th line with water, then added Slate reinker to fill it up to the 9th line. I had to refill this a second time for the second page. Just do the same steps.

STEP THREE: Prepping to Spray
Place your base cardstock in a cardboard box, on top of a piece of large scrap paper. Lay your stencil or overlay on top. Make sure it lays flat. Using the box helps you to contain any excess spray and minimize the mess.

STEP FOUR: Spraying
Hold your spray pen approximately 12" away and start spraying. Cover the entire page with sprayed ink. Remove the overlay.


STEP FIVE: Let Dry
If you spray a lot, your base page will be a little wet. Leave it for 10 minutes to dry. By the time you have your other layout pieces and photos cut, your pages will be dry.

REPEAT FOR YOUR SECOND BASE PAGE
If you don't have a spray pen, or don't want to use it, you can use a sponge and ink pad to apply the ink to your page. Be careful not to press too hard, and make sure your overlay/stencil doesn't move. Sponge the page until you have the intensity of colour you want.
HERE IS THE LAYOUT I CREATED USING THESE BACKGROUND PAGES

This layout features my little boy Charlie. He is now 8 years old, but he's always loved music. Even now, he can sit for hours just listening to his iPod. These pictures were taken when he snuck into his big brother's room to listen to his CD walkman. Good thing he didn't get caught!
SUPPLIES USED: All supplies are Close to my Heart
ProPlayer Paper Pack, including B&T paper, and cardstock (Slate, Whisper, Pacifica and White Daisy)
ProPlayer Assortment (embellishments)
Artbooking and Art Philosophy Cricut Cartridges, only available from CTMH
Make It from Your Heart Volume 2 Layout Sketch book, Layout #12
Slate ink and re-inker
Black, Pacifica and Ruby ink
Stamp Sets: Framework Alphabet, Tech Speak and All the Details
Slate Striped Twist Ties
Spray pen
Bonding Memories Glue
Subscribe to:
Post Comments
(Atom)
Close to my Heart

See what I'm up to on Facebook!


Look fun. Can't wait to try it! Love the layout, too.
ReplyDeleteVery interesting , good job and thanks for sharing such a good blog. Have you ever wondered if you can get Cash for Scrap Cars Canberra? Well, the answer is yes. Even if you have an unpaid, salvageable vehicle that you need to have removed from your property, there are companies out there that will tow it away for free or at a small fee.
ReplyDeleteRegard: Cash for Unwanted Cars Canberra